SAP Web Dynpro ALV Tutorial with Sample
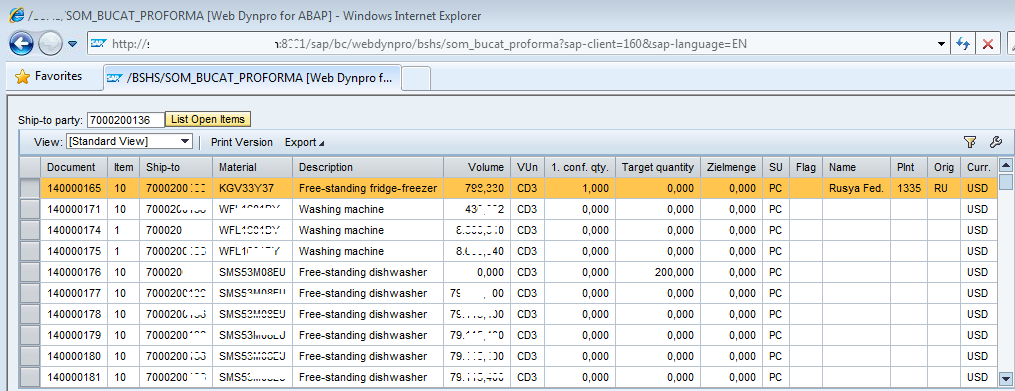
This SAP Web Dynpro tutorial shows ABAP developers how to use ALV table on web dynpro components as an alternative to table UI element for displaying internal table data on webdynpro pages. ABAP programmers can learn how to manage data for SAP ALV or table element on a Web Dynpro component using component controller context, design user interface using views and placing views and component controller ui interfaces on windows. Also as a programmer you wil find useful hints on data context, ui element container, views and embedding views and SAP components in windows. Perhaps best of this tutorial is it is showing developers how to use SAP Web Dynpro Code Wizard for minimizing ABAP code typing for a Web Dynpro component development task.
This tutorial se following main sections:
1) How to create web dynpro component
2) Hints on Web Dynpro project components for programmers
3) SAP SALV_WD_TABLE ALV Component usage in Web Dynpro
4) Web Dynpro ComponentController and Data Context
5) Mapping ALV Table Data to Context
6) Views and designing user interface
7) Web Dynpro Windows
8) Programming in ABAP for a Web Dynpro using Code Wizard
Create New Web Dynpro Component
In this SAP Web Dynpro tutorial, I want share what I learnt on Web Dynpro development and displaying ALV table on a Web Dynpro page. First of all, I want to create an SAP Web Dynpro component which is similar to below sketch or UI mockup.
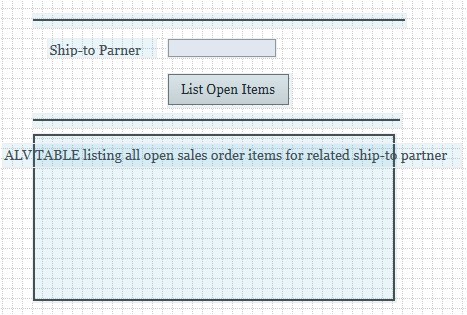
In this tutorial, ABAP developers can expect to see how to use an input box, a button and ALV table to query SAP database and display data on a Web Dynpro view.
Step 1: Call SAP transaction SE80 Object Navigator and start developing your first Web Dynpro component.
![]()
Step 2: In Transport Organizer tab, choose Web Dynpro Comp. / Intf. menu option to display, view or edit existing SAP Web Dynpro components or to create new Web Dynpro component.
If you want to create a new WebDynpro application, type the name you want to assign in the input text area just below the Web Dynpro Comp. / Intf. selection. Then press Enter.
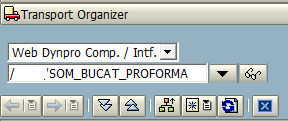
When the pop-up to confirm new SAP Web Dynpro component creation, press Yes.

Provide Web Dynpro component description
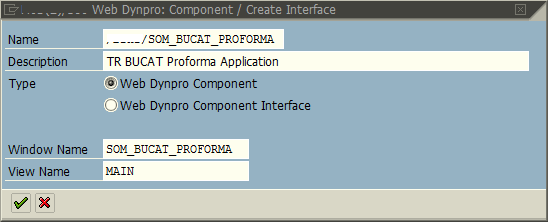
Press Enter and choose the ABAP development package you want to include your Web Dynpro component development. For a Web Dynpro tutorial sample, you can save the WD component as a local object.
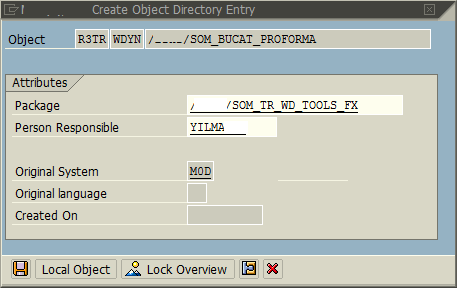
Press Save if required provide or create the workbench request for the new Web Dynpro Component
Hints for SAP Web Dynpro Developers
When a new Web Dynpro component is created in SE80 screen, all objects within the component can be seen in below screenshot.
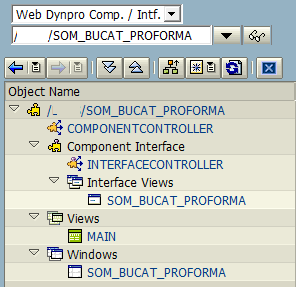
While developing Web Dynpro components, keep in mind that short and I believe useful hints.
First hint for Web Dynpro learners.
Define Used Web Dynpro Components like ALV, Select Options, etc only on the Used Components tab of Web Dynpro component itself.
To define used components once is enough if you define them on top level object of the Web Dynpro component.
It is not required to define them again and again on ComponentController, View objects or on Windows.
Another hint for Web Dynpro developers:
Define all your data context (objects that store data for layout controls in forms of attributes or tables) on ComponentController.
Then you can map these context objects to other Web Dynpro component objects like views, input forms or ALV tables, etc.
Please note that there is no Component Usages node and objects down under this node for ALV table or Select Options UI controls.
Component Usages node and details are created when the developer adds a Web Dynpro Component in the Used Components tab of the WD itself.
ABAP developers can use SALV_WD_TABLE as an ALV Component and WDR_SELECT_OPTIONS for Select Options on a Web Dynpro application.
SALV_WD_TABLE ALV Component in Web Dynpro
Now switch to edit mode and double click on the component top level object. Switch to Used Components tab. Using this tab we will include SAP Web Dynpro components like ALV using SALV_WD_TABLE component and select options using WDR_SELECT_OPTIONS.
Type a name as you wish in Component Use column and enter SALV_WD_TABLE in Component column as seen in below screnshot. Then press Enter. If the ABAP developers will use two ALV tables on the web dynpro application screen, the WebDynpro developer can create two used components with different names but using same SALV_WD_TABLE ALV component on this screen.
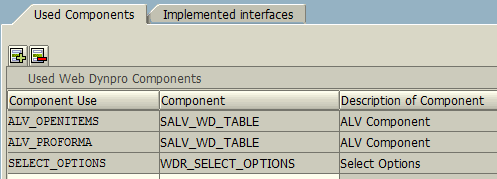
As you can see above, I defined two ALV tables with names ALV_OPENITEMS and ALV_PROFORMA.
Additionally I used WDR_SELECT_OPTIONS Select Options Web Dynpro component just to show you there is an other component available for your use. Developers can also refer to Web Dynpro tutorial on Web Dynpro Select Options
When used components are entered in the Used Web Dynpro Components tab and saved, a new node named Component Usages will be created automatically under the treeview structure of the Web Dynpro as follows.
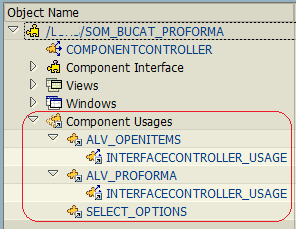
Web Dynpro developers will use these component usages for data mapping from context to ALV tables.
Web Dynpro ComponentController and Data Context
Let's now open ComponentController by double-click on it and start defining our data storage containers in forms of nodes and attributes for our application.
I have created a structure named Z_SOM_TR_CSC_PROFORMA_VBAP and a table type of this in data dictionary. I'll use this sturucture in the creation of both filter data context node and table data context node.
First, I start with filter node which will be used for storing ship-to partner number.
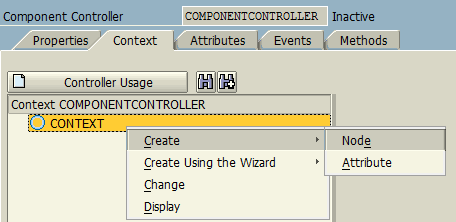
Right click on CONTEXT choose Create > Node option.
Enter node name, dictionary structure
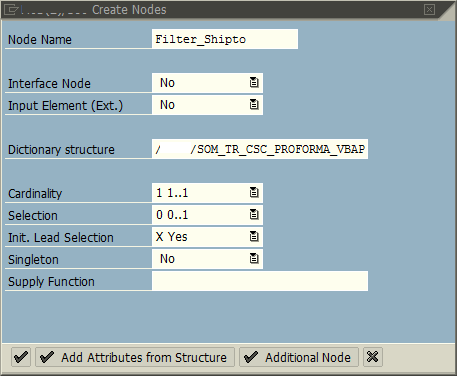
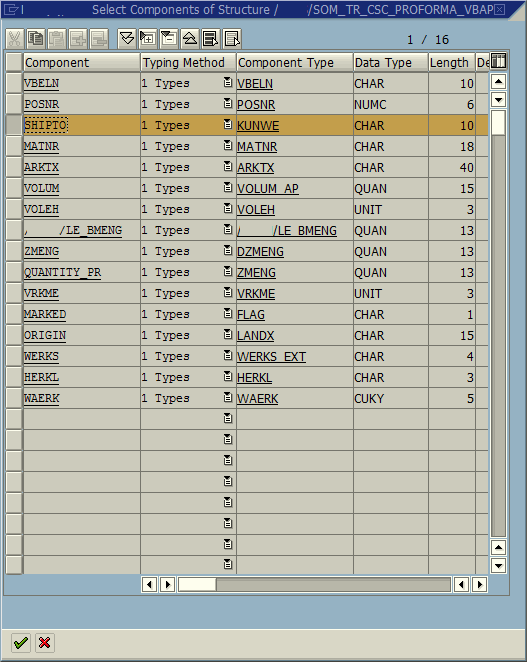
Since we do not need all columns of the structure, press "Add Attributes from Structure" button to select fields or attributes we are interested in.
I'm only interested in ShipTo partner data as the filter on the UI, so I highlight SHIPTO and press Enter
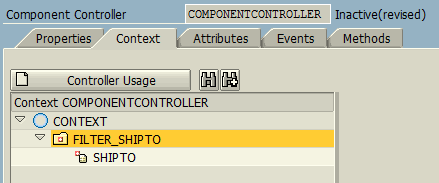
Here is our first data context in this SAP Web Dynpro tutorial
Our second data context node is for storing data for ALV table.
Again right click on top level Context node. Choose Create > Node.
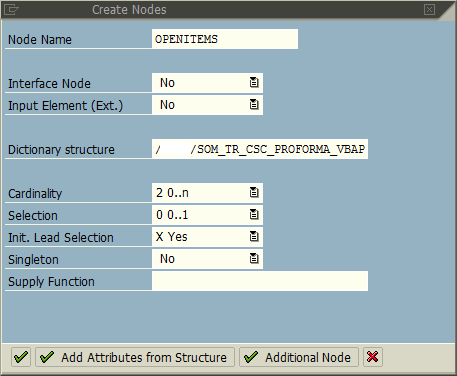
Enter node name, dictionary structure.
This time since our table can have 0 rows in it, set Cardinality to 0..n
Again press Add Attributes from Structure and choose all attributes for this ALV data node.
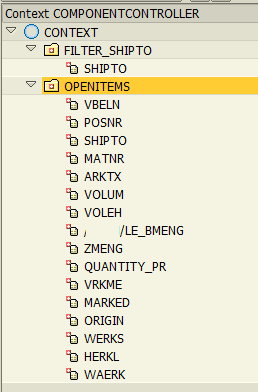
Here is the overview of all data context that will be used in this SAP Web Dynpro tutorial
Map ALV Table Data to Context
Let's now map context node data we created at ComponentController to ALV table control. SAP Web Dynpro developers can map data to ALV grid table controls or to an instance of SALV_WD_TABLE Web Dynpro component using Component Usages.
Drill-down to the ALV component you target. Open the Interface Controller node for the component usage.
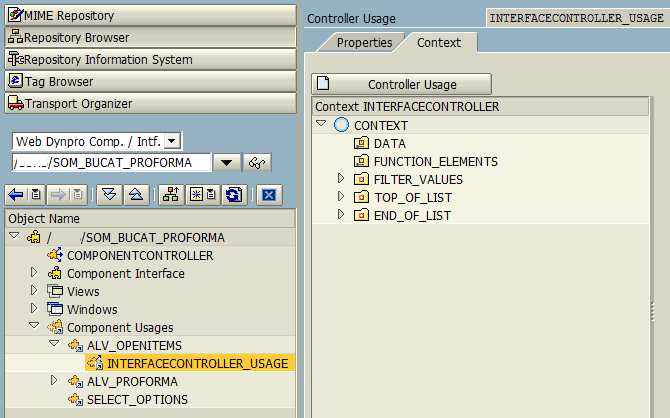
Click Controller Usage button.
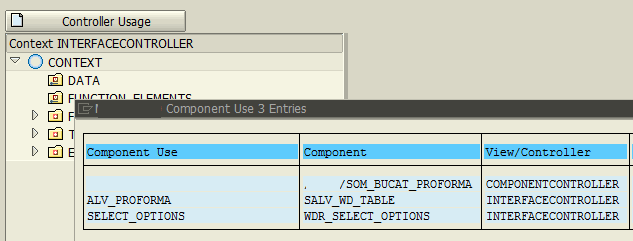
Choose the component with the name of the Web Dynpro itself. This maps to ComponentController context which is also visible at View/Controller column on the list.
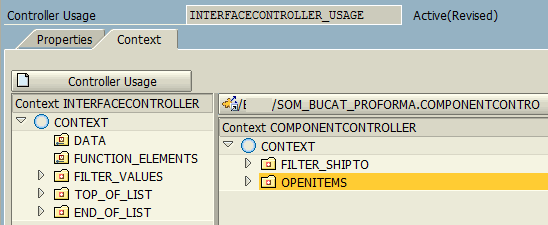
Since on ALV table we want to display OpenItems context (which is storing open sales order items), drag OPENITEMS from right side of the screen to the DATA node of the CONTEXT of InterfaceController (left side of the screen). The folder icon of DATA node will have now two way arrows on it.
If you see the Data node properties, you will see the Mapping Path is showing the Web Dynpro component > Component Controller > OpenItems Context

Design User Interface using MAIN View
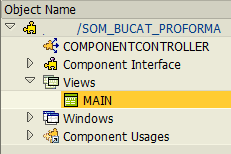
We are now ready to design the layout of the screens according to the mockup we prepared previously. For this, open the MAIN view under Views node. You will automatically directed to Layout tab which provides ABAP developers a visual development IDE.
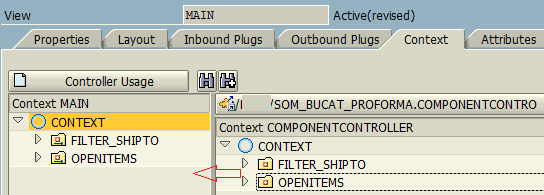
But first things first, switch to Context tab and drag Filter_ShipTo and OpenItems context nodes from right side (ComponentController Context) to Main view context (on the left side).
Let's now work on the layout controls of the web dynpro application.
First of all for the select screen, I will only use a textbox and a button.
I will automatically bind these controls to its context Filter_ShipTo using Container Form.
On Layout tab, right click on ROOTUIELEMENTCONTAINER and choose Create Container Form
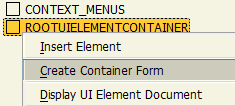
On the "Create Form Elements for Container" screen, click on the Context button and choose the Filter_ShipTo context node This selection will automatically create required input fields on the form element container and bind them to data context.
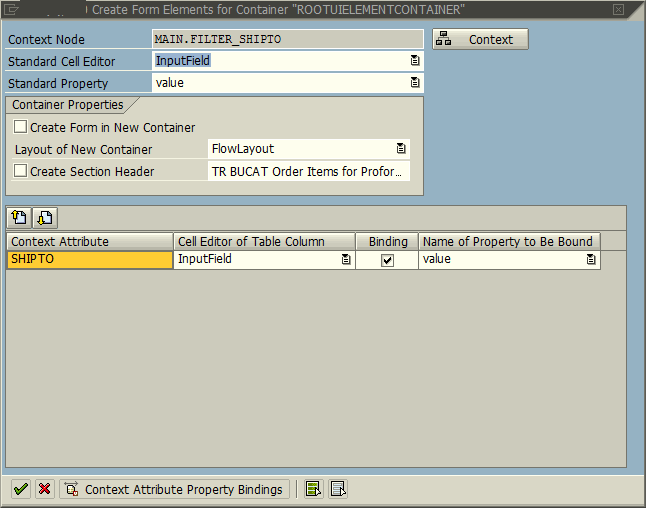
Here is out form on Main view which includes the Ship-To partner input box

We should add a button to this form on Main view now Right click on RootUIElementContainer and choose "Insert Element"

Choose BUTTON from Type dropdown and name your button using ID input textbox.
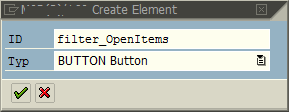
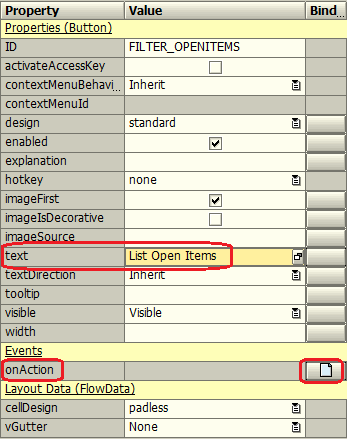
Now click on button and on button properties window on the bottom right of the SE80 screen, add a text which will be visible to your SAP users. And to define an action for the button, on Events section at onAction line press the Create icon as shown below.
When create action dialog screen is displayed, provide an action name on Action textbox and optionally a description for this button action (event)
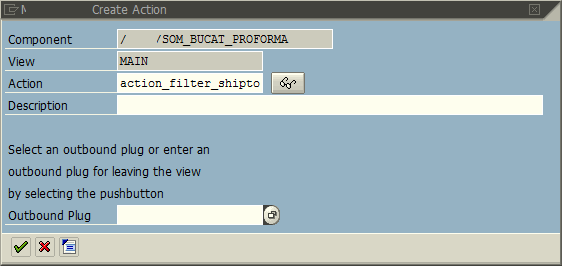
Developers can double click on onAction value "ACTION_FILTER_SHIPTO" (the name you assing to your button action) to display ABAP source codes to be executed after this event is triggered when button is pressed. We will code for action event later in this Web Dynpro tutorial.
If you want to test your progress up to this point, you can read Web Dynpro tutorial Test Web Dynpro Component by creating Web Dynpro Application. When you test your WD component, you will see a label, the textbox and the button on a new web browser screen.
Let's now continue working on the Web Dynpro Layout with placing ALV table.
Right click on RootUIElementContainer and select Insert Element

Type a name for the container which we will display SAP ALV table. Choose the element type as VIEW_CONTAINER_UIELEMENT.
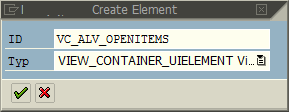
And here is the last situation after View_Container_UIElement is added on Main View

ABAP developers probably realized that we did not yet map or add the ALV component on the container but placed a container for it. In fact we will add the ALV component into the UI container we have just created on the Main view using the "Windows"
Web Dynpro Component Windows
Open Windows node as in below screenshot and double click to open the Window details. Using Window developers can views on web dynpro pages. You can think of a Window as a web page, and View as a section of it.
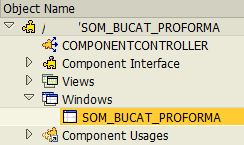
Switch to Window tab. And drill-down until you see the view container ui element we have created for the ALV table. Right click on it and select Embed View
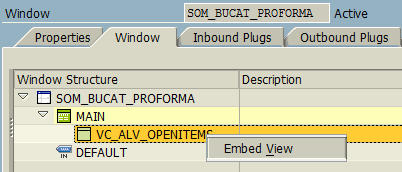
Embed a View dialog screen is displayed
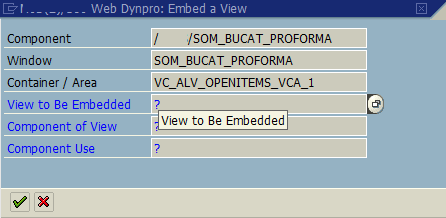
Click on input area "View to Be Embedded" and using F4 help display available valid options.

Double-click on the item which has our ALV table name "ALV_OPENITEMS" in Component Use column, "SALV_WD_TABLE" as Component and "TABLE" in View/Interface View column. This view embedding will place the ALV table we have created for displaying open sales order items into the container on the Main view and on the web dynpro Window.
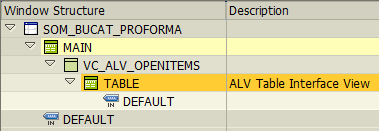
Now the Web Dynpro Window structure will be shown on Window tab as follows
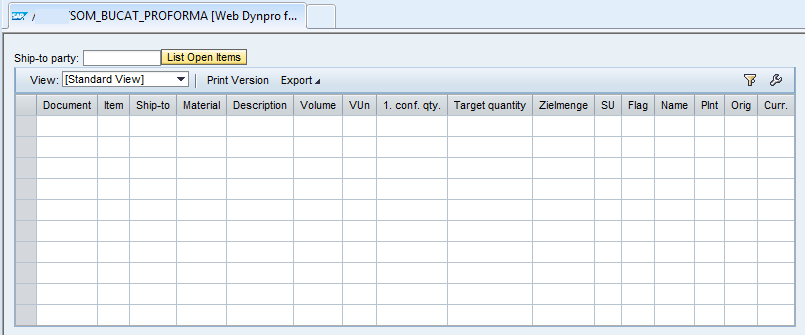
Now if you test the Web Dynpro page, you will be able to see the ALV table as well.
SAP Web Dynpro Programming using ABAP
Now we are ready to code in ABAP after the search button is pressed and button action is triggered. This code will read the entered filter data which is in our sample tutorial, the ship-to partner number. Then using ship-to customer, we will query SAP tables. And then assign the returned data to ALV context which will result data to be displayed on the SAP ALV table automatically.
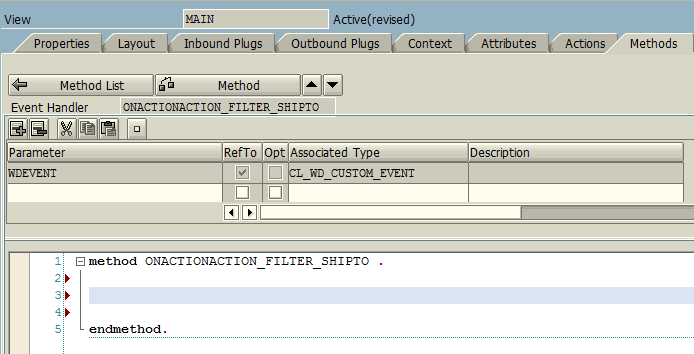
Return to Main View. Click on button. On properties section, double click on onAction created to open ABAP source codes of the button action.
This is our code editor
1) read FILTER node for VBAP search into LS_FILTER_NODE
Press Code Wizard icon.

Using Context button, select FILTER_SHIPTO context node which we created for storing filtering options. Then on Operation on Context section, select Read option.

When Enter is pressed following ABAP code is automatically added.
data LO_ND_FILTER_SHIPTO type ref to IF_WD_CONTEXT_NODE.


data LO_EL_FILTER_SHIPTO type ref to IF_WD_CONTEXT_ELEMENT.

data LS_FILTER_SHIPTO type WD_THIS->ELEMENT_FILTER_SHIPTO.


* navigate from <CONTEXT> to <FILTER_SHIPTO> via lead selection

LO_ND_FILTER_SHIPTO = WD_CONTEXT->GET_CHILD_NODE( NAME = WD_THIS->WDCTX_FILTER_SHIPTO ).


* @TODO handle non existant child

* IF lo_nd_filter_shipto IS INITIAL.

* ENDIF.


* get element via lead selection

LO_EL_FILTER_SHIPTO = LO_ND_FILTER_SHIPTO->GET_ELEMENT( ).

* @TODO handle not set lead selection

if LO_EL_FILTER_SHIPTO is initial.

endif.


* get all declared attributes

LO_EL_FILTER_SHIPTO->GET_STATIC_ATTRIBUTES(

 importing

 STATIC_ATTRIBUTES = LS_FILTER_SHIPTO ).
Read customer number
check LS_FILTER_SHIPTO-SHIPTO is not initial.

data LV_KUNNR type KUNNR.

LV_KUNNR = LS_FILTER_SHIPTO-SHIPTO.
Using Shipt-to customer, query database tables VBAK, VBAP and ... I created a function module for this task. I call it using PATTERN button on the top menu.
data: LT_PROFORMA_ITEMS type Z_SOM_TR_CSC_PROFOR_T_VBAP.

 call function 'Z_SOM_TR_CSC_OPENORDERITEM'

 exporting

 P_KUNNR = LV_KUNNR

 importing

 T_PROFORMA_ITEMS = LT_PROFORMA_ITEMS.
Now set dataset returned to context node of the ALV table. Press Code Wizard. Press Context button and choose OPENITEMS context node. Then select option Set Be sure you marked "As Table Operation" checkbox.
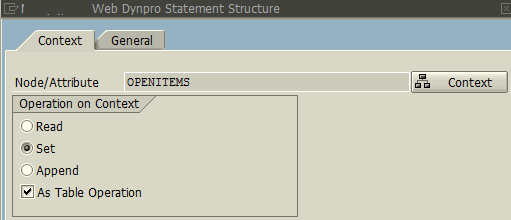
Following ABAP code is generated by wizard
data LO_ND_OPENITEMS type ref to IF_WD_CONTEXT_NODE.

data LT_OPENITEMS type WD_THIS->ELEMENTS_OPENITEMS.


* navigate from <CONTEXT> to <OPENITEMS> via lead selection

LO_ND_OPENITEMS = WD_CONTEXT->GET_CHILD_NODE( NAME = WD_THIS->WDCTX_OPENITEMS ).


* @TODO handle non existant child

* IF lo_nd_openitems IS INITIAL.

* ENDIF.


** @TODO compute values

** e.g. call a model function

LO_ND_OPENITEMS->BIND_TABLE( NEW_ITEMS = LT_OPENITEMS SET_INITIAL_ELEMENTS = ABAP_TRUE ).
Add following internal table assignment where the code line "** @TODO compute values" is displayed.
LT_OPENITEMS[] = LT_PROFORMA_ITEMS[].
That is all. Activate and create application to test.
